Chicken soup…for the soul (and dogs)

Last week when I made and canned chicken stock, I froze some of it to save for this weekend so I could make some chicken soup.

Chicken soup

I make my chicken stock and chicken soup as frugally as I can. The chicken stock is made with bones and random pieces of chicken that I save up for a while in the freezer–backbones, neckbones, even the liver and other inside pieces that they give you when you buy a whole chicken. Then I throw in some odds and ends of vegetables that I save in the freezer, like the ends of celery and carrots. All of that goes into a big pot with water to cook for a few hours to make chicken stock.

Then for the chicken soup, I do use fresh vegetables, not the odds and ends (carrots, onion, and celery). The chicken is bits and pieces I’ve been saving for a while in a bag in the freezer, little bits left over when we have chicken for supper and even the bits I manage to pull off the bones after making chicken stock. I use the chicken soup recipe from the Ball Blue Book, though I do use less onions than they say to use. I like onions, but I prefer not to have a strong onion flavor. Then during the winter, when I open up a jar I add in some egg noodles while I heat it up and have homemade chicken noodle soup.

Zoey

I had just a little bit of broth and chicken pieces left over, so the dogs got a little bit of their own chicken soup too. They licked their bowls clean!

Last grasp at summer and signs of fall

Watermelon

I know it’s officially fall and all, but don’t tell my garden that. It decided to revive a mostly dead vine and grow a new watermelon. Okay, I’ll take it, even though it doesn’t really go with the rest of what I’m growing.

Fall Garden

And here is the current state of the rest of the garden. The two outer rows are collards, one Georgia collards and the other Carolina collards. What’s the difference? One’s from Georgia and one’s from the Carolinas! Ha. Really, I don’t know, but I couldn’t decide which ones were the taste we were looking for, so I planted both. We stopped trying to grow collards in the summer because a) the bugs EAT THEM UP and b) we prefer collards after they’ve been hit by the first frost of the season. Fall collards just taste better!

The row in the center is broccoli. I’m going to give up trying to grow summer broccoli because the bugs eat those up too. So I’m hoping I can get some fall broccoli since those darn bugs ate up the one broccoli plant that came up this summer.

Friday Links

Breaking Free From Real Food Burnout @ Keeper of the Home
“The best way to get burnt out is to think of eating well as a target – and one you have to hit the first time.”

The Art of Homesteading – How to Feed Your Family From Your Land @ Old World Garden Farms
“Where does one start?  Well, what it really boils down to is a little planning to ensure that you meet your food goals.”

25 Things I Don’t Buy in the Grocery Store (And What I Use Instead)
“Don’t feel guilty about what you do eat. Instead, research these items in more depth, figure out what ingredients are used to make them, and decide if you really want to be spending your hard-earned cash on these foods!”

Rain, rain…

I fight a continuous battle with my feelings on rain.

When you start growing a lot of your own food, you want some rain. When it rains, you think, “Yay! Now I don’t have to go water the garden myself!” And seeing as how I just recently planted a bunch of collard and broccoli seedlings, I’m happy to let nature water them for me.

But then, inside, I’m really a sunshine kind of girl. I love warm, sunny days. I don’t like looking outside and seeing gray skies and mud everywhere.

But life on earth needs rain. I know that. I accept it. We have to have rain sometimes.

It’s just when it gets to be three days in a row of rain, it’s really hard to remain accepting and appreciative of rain. Especially since B’s job is dependent on non-rainy days. He works for a company that does concrete and soil testing at construction sites, so he works along with the construction crews. Which means that if it’s raining and the construction guys can’t do their job, then B can’t do his.

Which means we’re once again struggling to pay bills.

But on the plus side: we have plenty of food that I canned this spring and summer. We have a good supply of meat in the freezer right now. We can cut back on groceries this week to save some money. This is one of the reasons we grow our own food and why I preserve as much as I do, for the times like this that sneak up on us.

It’s apple season!

Apple peeling

Apples are popping up at the farmer’s market, a sign that fall is here! I bought a few different varieties this weekend and got to use my apple peeler/corer/slicer for the first time. I hosted a Pampered Chef party a few months ago and used my hostess perks to get a discount on this thing. I LOVE IT. Once I figured out how to use it, it made everything go so quickly.  I used it to slice up some apple rings, which I put into the dehydrator sprinkled with cinnamon. Oh, those things made the house smell SO good. I just got my dehydrator for my birthday last month, so this is my first time making apple chips. I’ll definitely be making more of them!

Canning

I also used the peels along with a few more chopped apples to make some applesauce, and then used the leftover juice for apple juice. I ended up with 3 pints of applesauce and 3 quarts of apple juice (one of which didn’t get canned, it went straight into the fridge to drink right away). I also canned four pints of the chicken stock that I posted a picture of in my last post. Since the busy season of canning tons of tomatoes, cucumbers, and peaches is over I can work on getting chicken stock and soups done in between making applesauce and juice.

Beautiful chicken stock and homestead dreams

Chicken stock

Is it weird that the above picture makes me giddy? Freshly made chicken stock (in my vintage Pyrex, which also makes me giddy on its own), strained and ready to go into the refrigerator so the fat can congeal and be removed before I can the stock. This is what I think of when I think of my dream life furthering our homesteading goals: homemade chicken stock, nutritious soups, jars and jars of jams and fruits, chickens and goats and rabbits out in the yard.

We’re not all the way there yet in our dreams, but we’re working on it. I do can as much as possible each year–peaches, pears, jams, jellies, tomatoes, tomato soup, beans, corn, pickles–and many of the vegetables come from our own garden. We have the chickens and keep a supply of eggs from them. We’re planning to get meat rabbits, hopefully by next spring? And I’m trying to make as much homemade foods as I can. Which is why I spent the last few hours cooking chicken pieces and vegetable scraps on the stove.

I also made chocolate ice cream during that time. Not on the stove. In the ice cream maker. Just to be clear.

It’s a lot of work sometimes, but I do love this life!

Candle stand makeover

photo(1)

I found this candle stand/pedestal at Goodwill for $1.99. It was originally an ugly bronze, but I’d been looking for something to hold these candles in the corner of the hall bathroom counter. I was too eager to paint it to stop and take a before picture! A quick coat of Krylon spray paint in jade and it looks much better.

Laundry room decor

washboard

My thrift find today: a washboard! I grabbed it and brought it home to hang in my laundry room, as a reminder of where we’ve come from in terms of household work. A good reminder to be thankful for the nice washer and dryer I have.

The “laundry rules” picture is something I found online last year and printed out. The smallest picture is a postcard that came with the order of a print from The Black Apple a couple years ago. And the other picture is a cross stitch I did probably ten years ago? The bottles are my husband’s collection, his contribution to the vintage decor in the house!

Pear Crumble (Crisp, whatever you want to call it)

I made this last night for my women’s bible study group. I had some pears I’d canned back in the fall and I wanted something quick and easy to make. This fit the bill. I did cut back on the sugar from the original recipe.

photo

Pear Crumble

Ingredients:

  • 4-5 pears, peeled and diced
  • 1/2 cup sugar
  • 1/4 tsp salt
  • 1 1/2 cups flour
  • 1/4 cup sugar
  • 1/4 cup brown sugar
  • 1/2 tsp cinnamon
  • 1 stick melted butter

Preheat oven to 350 degrees. Stir pears with 1/2 cup sugar and salt, then pour into baking dish.

Combine flour, remaining sugar, brown sugar, and cinnamon in a bowl. Drizzle melted butter on top and stir until mixed. Spread topping over the pears in the baking dish.

Bake uncovered for 35-40 minutes.


I was told, “This pear stuff is the bomb!” It is really good and sweet even with the sugar cut in half.

Milk kefir: easy to make, great tasting, and good for you too!

A few years ago, I started making homemade yogurt. I loved yogurt and ate it every day, but I hated the idea of all those little plastic containers going into the trash. I figured there had to be a cheaper, more sustainable option, so I searched the internet and found directions on making homemade yogurt.

I was so used to the sweetened, flavored yogurts that the taste of homemade yogurt took some getting used to. I had to wean myself off the need for sugar in it by reducing the amount of sugar I added each week until I was adding none. Now, the flavor doesn’t bother me at all, but I stopped making yogurt after a couple of batches didn’t turn out like they should have. Yogurt can be a bit finicky sometimes.

Then, last year, I discovered milk kefir smoothies at the grocery store and I loved them! So good and a lot like the yogurt I loved. I figured out that you can make kefir at home for much cheaper than buying the bottles of it from the store, so a couple months ago I bought some kefir grains from a seller on etsy and dove in.

Milk kefir is much more forgiving than yogurt is! It’s so simple and takes very little effort to get a great tasting smoothie that’s also good for you. If you’ve never had Greek or unflavored yogurt, you may find milk kefir to be a bit sour. I would recommend adding a little sugar at first and then weaning yourself off it like I did with the homemade yogurt. I drink a homemade milk kefir smoothie each morning, flavored with blueberries or strawberries (or both).

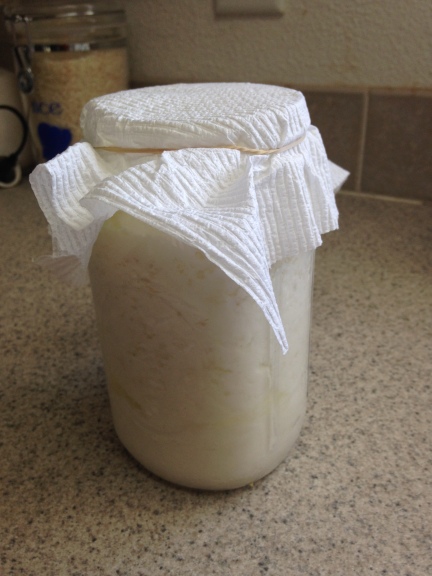
milk kefir


This is what my milk kefir looks like after sitting on the counter for 24 hours. It’s ready to be strained!

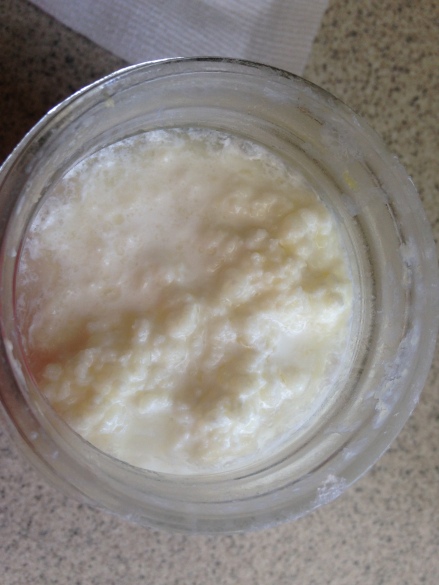
milk kefir

I admit that this doesn’t really look very appetizing.

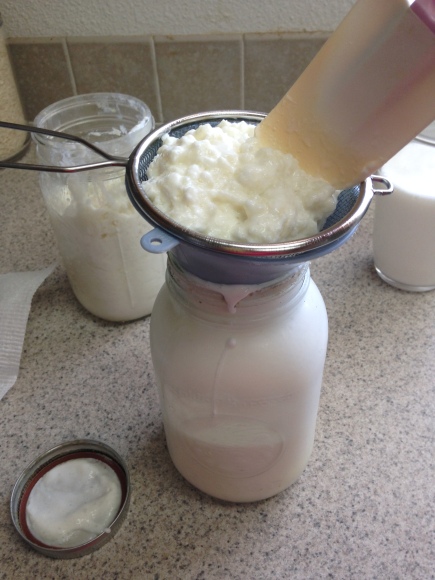
milk kefir

Strain the liquid from the grains into another jar. You have to move the kefir around a bit to help get the liquid moving.

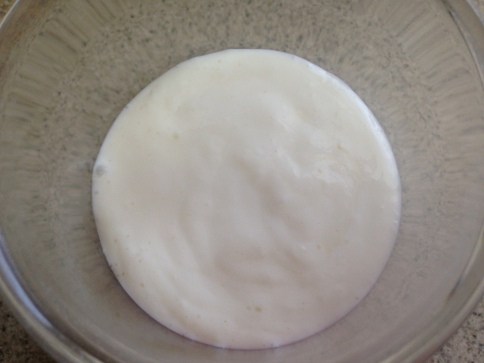
IMG_0085

You’ll end up with this smooth, thick liquid. Blend in fruit and enjoy!

Kefir is full of good bacteria that help regulate your digestive system. You know all those commercials talking about probiotics in yogurt or special pills? You can get that same thing easily by making your own milk kefir. It’s SO simple to make. Just add some kefir grains to a jar with milk, cover with cheesecloth or a paper towel, and let it sit on the counter for 24 hours. Then strain it and you have kefir. It takes very little attention or work from you to produce.

You can read more about the benefits of kefir at this article: Why We Need Probiotics and the Benefits of Kefir.